Introduction
In the modern development landscape, efficiency and scalability are paramount. This blog post introduces a robust solution where LocalStack serves as the cornerstone for local development environments, significantly simplifying the transition to AWS for production. We focus on leveraging LocalStack to emulate AWS services locally, ensuring that developers can work efficiently without reliance on actual AWS environments in the initial stages.
Please follow along by cloning this repository.
Architecture Overview
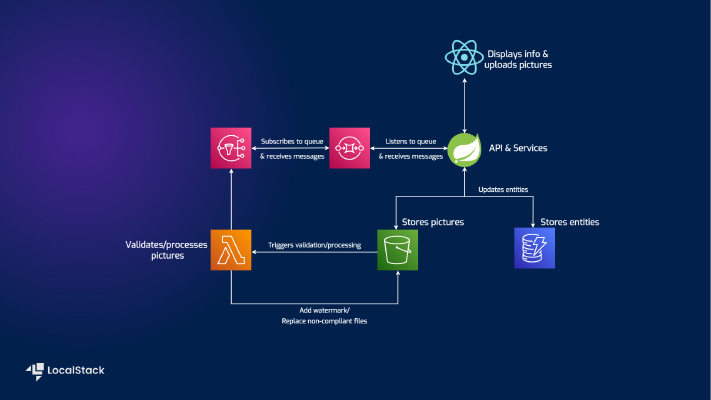
Our demo application utilizes a Spring Boot backend with a React frontend, illustrating typical CRUD (Create, Read, Update, and Delete) operations on shipment data. Both of these applications are running on localhost, as they’re in the build phase and they receive constant improvements. The architecture is supported by various AWS services, emulated locally by LocalStack.
Key Components
The backend application leverages:
- S3: For storing images.
- DynamoDB: For storing data related to our entities.
- Lambda: For image processing and validations.
- SNS/SQS: For managing notifications and message queuing, when the Lambda function is done operating.
- Server-Sent Events: When listening on the queue and receiving the message, the app will automatically refresh the frontend

Prerequisites
To follow along, you’ll need:
- Java 17 and Maven 3.8.5 for backend setup
- Docker to run LocalStack
- Terraform for infrastructure management. (+ Python pip for installing tflocal)
- npm for running the frontend
- AWS free tier account
Starting LocalStack
Starting LocalStack means initializing our local environment to emulate AWS services. Here’s how we configure it using Docker Compose with some configuration flags to tailor the setup:
| |
Let’s break down the essential parts:
image: Specifies the Docker image to use.localstack/localstack-pro:latestuses the latest version of the LocalStack Pro image, for which you will need to have aLOCALSTACK_AUTH_TOKEN. You can get one by signing up here.4566: This is the default port for LocalStack, acting as the gateway to all AWS services provided by LocalStack.4510-4559: This is a range of ports used for any additional services or custom configurations that LocalStack might need to expose.DEBUG: Enables verbose logging if set to1.ENFORCE_IAM: Enforces IAM policies when set to1, adding an extra layer of security by ensuring that actions are permitted by IAM before they can be executed.LOCALSTACK_AUTH_TOKEN: The environment variable for the LocalStack API authentication token, which is passed from the host environment.
Terraform Integration
Terraform scripts play a pivotal role in defining and replicating infrastructure seamlessly between local and production environments. The full configuration file can be found in the project repository, in the terraform folder. We’ll use it to set up the following:
- An S3 bucket for image storage and code storage for the Lambda JAR.
| |
Each bucket contains a suffix at the end of its name to ensure unique naming when running on AWS.
- A DynamoDB table for our shipments.
| |
This Terraform configuration creates a shipment DynamoDB table with a primary key shipmentId, provisioned read capacity of 10, and write capacity of 5, enables server-side encryption, and activates DynamoDB Streams with both new and old images of items. It then populates the table with data from local.tf_data.
Make sure to check out the full Terraform configuration file for the intermediate configs (such as triggers, service IAM permissions, integrations, etc).
- A Lambda function for image processing.
| |
This part of the configuration uploads the Java Lambda function code shipment-picture-lambda-validator.jar to an S3 bucket and defines a Lambda function named shipment-picture-lambda-validator with Java 17 runtime, setting its handler, IAM role, memory allocation of 512 MB, 60-second timeout, and environment variables.
- IAM policies that define the interaction between the Lambda function and the CloudWatch service, S3 bucket, and SNS topic.
| |
This part defines an IAM role policy named lambda_exec_policy that grants the associated Lambda function permissions to create and manage logs in AWS CloudWatch, access and modify objects in specific S3 buckets, and publish messages to a designated SNS topic.
- SNS topics and SQS queues for message communication.
| |
We end off with the creation of an SNS topic and an SQS queue, both for updating shipment pictures, and then set up a subscription to route messages from the SNS topic to the SQS queue.
Development and Testing Locally
With our LocalStack environment running via Docker, we can execute Terraform scripts locally to create and manage AWS resources without any cloud association. Here’s how you can manage this with tflocal, a handy wrapper around the Terraform CLI tool that configures the LocalStack endpoint. This way we don’t have to manually define any LocalStack configuration in the main.tf file.
| |
This command initializes the Terraform environment by downloading all the necessary providers and any plugins or modules that they might require.
| |
The plan command will give us a comprehensive list of changes that will be applied to the stack. If you’re running this command for the first time after init the changes will consist of the full list of resources.
| |
Now it’s time to apply the changes.
This process ensures that our infrastructure is set up exactly the same way it would be on AWS, but locally.
Running the Spring Boot backend application
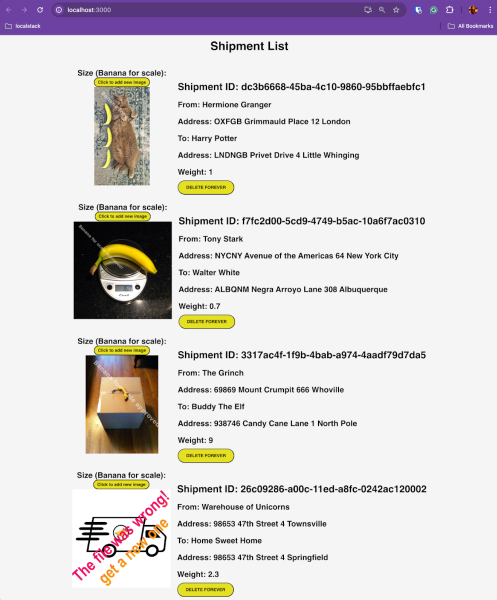
The AWS services have been created, so now it’s time to connect our application to them. This app is a typical Spring Boot backend, that exposes some endpoints which allow the user interface to read, make updates to the entities by uploading pictures, and eventually delete them. We’ll have a little fun with the depiction of the packages, and we’ll use the Internet International System for measuring, called Banana for scale.
To get things running, we need to run the following command:
| |
Notice the profile value set to dev. This means that our application will read from the configuration file dedicated to the development environment.
In the src/main/resources folder, there are two files, for configuring separate profiles, application-dev.yml, and application-prod.yml.
Spring profiles
Spring profiles let you define settings for different environments (like development, testing, and production) within your Spring application, allowing you to activate specific configurations based on the environment you are running in. This helps manage application behavior easily without changing the code.
For the local development case, our application will read from the application-dev.yml file, which looks like this:
| |
This configuration sets up access to AWS services using specific endpoints for S3, DynamoDB, and SQS, all pointing to the LocalStack instance running locally. It also includes some dummy AWS credentials (access key and secret key) and specifies the AWS region as us-east-1.
These values (aws.s3.endpoint, aws.dynamodb.endpoint, aws.credentials.access-key, etc), will then be used wherever they are configured in the application, by using the @Value annotation. For example, in the S3 client configuration class:
| |
Starting the React Application
The frontend application is located in the shipment-list-frontend folder. In order to start the app, you need to have npm installed and run the following commands:
| |
| |
These commands will install the necessary dependencies and start the interface on localhost:3000.
Now it’s coming together
If you navigate to http://localhost:3000/ you can start adding pictures (try using the included pictures).

Smooth Transition to AWS
Once development and testing are complete locally, moving to AWS is straightforward. The same Terraform scripts used in the local setup are employed to replicate the environment in AWS. This ensures that the application behaves consistently across both platforms.
It goes without saying that in order to use AWS cloud resources, you need to have an account (preferably free tier) and an IAM user configured with an AdministratorAccess policy. Some companies will have more restrictive and fine-grained permissions defined, for allowing the creation/update of each individual resource. In this case, we will choose an umbrella policy, that covers all our needs.
Make sure you configure your local environment with the necessary credentials:
| |
| |
Similar to the local setup, let’s run:
| |
| |
This time around our backend application needs to use the prod profile:
| |
This approach minimizes the discrepancies between local development and production environments, reducing integration issues and deployment risks.
Awesome LocalStack features
You’ve noticed in the architecture diagram that the Lambda function is interacting with an S3 bucket and an SNS topic, for which it’s using the AWS Java SDK. LocalStack is using transparent endpoint injection which enables seamless connectivity to LocalStack without modifying your application code. The DNS Server resolves AWS domains such as *.amazonaws.com including subdomains to the LocalStack container. Therefore, your application seamlessly accesses the LocalStack APIs instead of the real AWS APIs.
For example, this is how our clients look, without any need to configure additional endpoints:
| |
and
| |
The LocalStack SQS queue will communicate with the backend listener, to send the same message as the AWS queue would send, as seen in the logs:
| |
The account number for LocalStack will always be 000000000000.
Conclusion
Utilizing LocalStack for local development with Terraform provides a highly effective and efficient development workflow. By focusing on LocalStack initially, we reduce dependencies on external services during development, which not only cuts costs but also accelerates the development cycle. This setup ensures that when it’s time to transition to AWS, the process is seamless, predictable, and reliable.
From here on, there are only a few steps towards automation: running integration tests for your AWS resources, running your IaC and tests in CI pipelines to always have a boost of confidence before deploying. The possibilities are plenty.

